|
|
|
| Caution | Only authorized service personnel should upgrade the system. Anyone who wants to upgrade the system herself/himself should know about the dangers of ESD (Electro-Static Discharge) and the necessary precautions. Unknowingly zapping the components of the computer will void the warranty. |
This motherboard can accommodate the following CPUs:
Single Edge Contact (SEC) cartridge
Uses the SLOT1 CPU socket
Not keyboard switchable.
Disable cache to slow down the system.
Jumper setting information can be found in the 1010 Motherboard Jumpers section.
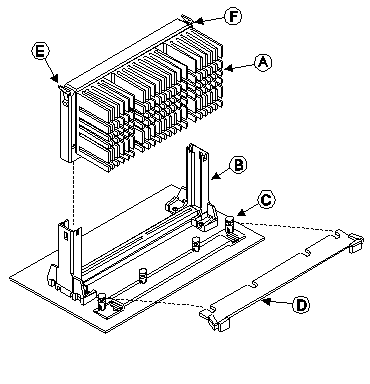
| Figure 1 | |
|---|---|
 |
|
| Figure 1 Legend | |
| A | SEC Cartridge with Example Heatsink Attached |
| B | SEC Cartridge Retention Mechanism |
| C | Heatsink Support Base |
| D | Heatsink Support Top Bar |
| E | Right Latch Arm |
| F | Left Latch Arm |
CPU Removal & Insertion (Figure 1)
 |
Note: Observe Electro Static Discharge (ESD) precautions. |
The steps for removal of the SEC Cartridge are as follows:
Reverse the above procedure for reinstallation.