|
|
|
| Caution | Only authorized service personnel should upgrade the system. Anyone who wants to upgrade the system themselves should know about the dangers of ESD (electrostatic discharge) and the necessary precautions. Unknowingly damaging the components of the computer will void the warranty. |
Maximum on Motherboard: 512MB
Uses 8/16/32/64/128/256 MB DIMMs, 60ns or faster EDO SDRAM DIMMs
Supports only non-parity DIMM modules.
Note
| DIMM Type (Bank 1) | DIMM Type (Bank 2) | |
|---|---|---|
| 1M X 64 (8 MB) | Empty | 8 MB |
| 1M X 64 (8 MB) | 1M X 64 (8 MB) | 16 MB |
| 1M X 64 (8 MB) | 2M X 64 (16 MB) | 24 MB |
| 1M X 64 (8 MB) | 4M X 64 (32 MB) | 40 MB |
| 1M X 64 (8 MB) | 8M X 64 (64 MB) | 72 MB |
| 1M X 64 (8 MB) | 16M X 64 (128 MB) | 136 MB |
| 1M X 64 (8 MB) | 32M X 64 (256 MB) | 264 MB |
| 2M X 64 (16 MB) | Empty | 16 MB |
| 2M X 64 (16 MB) | 1M X 64 (8 MB) | 24 MB |
| 2M X 64 (16 MB) | 2M X 64 (16 MB) | 32 MB |
| 2M X 64 (16 MB) | 4M X 64 (32 MB) | 48 MB |
| 2M X 64 (16 MB) | 8M X 64 (64 MB) | 80 MB |
| 2M X 64 (16 MB) | 16M X 64 (128 MB) | 144 MB |
| 2M X 64 (16 MB) | 32M X 64 (256 MB) | 272 MB |
| 4M X 64 (32 MB) | Empty | 32 MB |
| 4M X 64 (32 MB) | 1M X 64 (8 MB) | 40 MB |
| 4M X 64 (32 MB) | 2M X 64 (16 MB) | 48 MB |
| 4M X 64 (32 MB) | 4M X 64 (32 MB) | 64 MB |
| 4M X 64 (32 MB) | 8M X 64 (64 MB) | 96 MB |
| 4M X 64 (32 MB) | 16M X 64 (128 MB) | 160 MB |
| 4M X 64 (32 MB) | 32M X 64 (256 MB) | 288 MB |
| 8M X 64 (64 MB) | Empty | 64 MB |
| 8M X 64 (64 MB) | 1M X 64 (8 MB) | 72 MB |
| 8M X 64 (64 MB) | 2M X 64 (16 MB) | 80 MB |
| 8M X 64 (64 MB) | 4M X 64 (32 MB) | 96 MB |
| 8M X 64 (64 MB) | 8M X 64 (64 MB) | 128 MB |
| 8M X 64 (64 MB) | 16M X 64 (128 MB) | 192 MB |
| 8M X 64 (64 MB) | 32M X 64 (256 MB) | 320 MB |
| 16M X 64 (128 MB) | Empty | 128 MB |
| 16M X 64 (128 MB) | 1M X 64 (8 MB) | 136 MB |
| 16M X 64 (128 MB) | 2M X 64 (16 MB) | 144 MB |
| 16M X 64 (128 MB) | 4M X 64 (32 MB) | 160 MB |
| 16M X 64 (128 MB) | 8M X 64 (64 MB) | 192 MB |
| 16M X 64 (128 MB) | 16M X 64 (128 MB) | 256 MB |
| 16M X 64 (128 MB) | 32M X 64 (256 MB) | 384 MB |
| 32M X 64 (256 MB) | Empty | 256 MB |
| 32M X 64 (256 MB) | 1M X 64 (8 MB) | 264 MB |
| 32M X 64 (256 MB) | 2M X 64 (16 MB) | 272 MB |
| 32M X 64 (256 MB) | 4M X 64 (32 MB) | 288 MB |
| 32M X 64 (256 MB) | 8M X 64 (64 MB) | 320 MB |
| 32M X 64 (256 MB) | 16M X 64 (128 MB) | 384 MB |
| 32M X 64 (256 MB) | 32M X 64 (256 MB) | 512 MB |
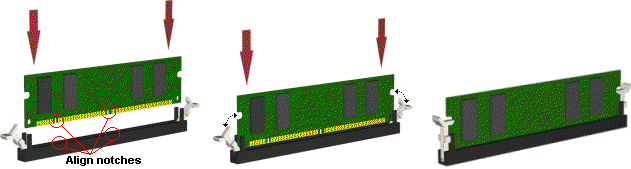
Installing DIMMs (DIMM1, DIMM2)
The following is a procedure for installing DIMM modules into a DIMM socket.
Step 1:
Line up the DIMM module as illustrated in Figure 1. Pin 1 is indicated by a small triangle on the motherboard. Insert the module straight into the socket. The DIMM module is keyed and can only be inserted one way.
Step 2:
Insure that the DIMM module is secure in the socket and snap the locking tabs located on both ends of the socket firmly into place as illustrated in Figure 1.
| Figure 1 | ||
|---|---|---|
 |
||
Once the DIMM modules are installed, the system will display the correct amount of memory. Since the system automatically detects the amount installed, there are no jumper settings for memory configuration. The memory should be enabled and fully functional.