|
|
|

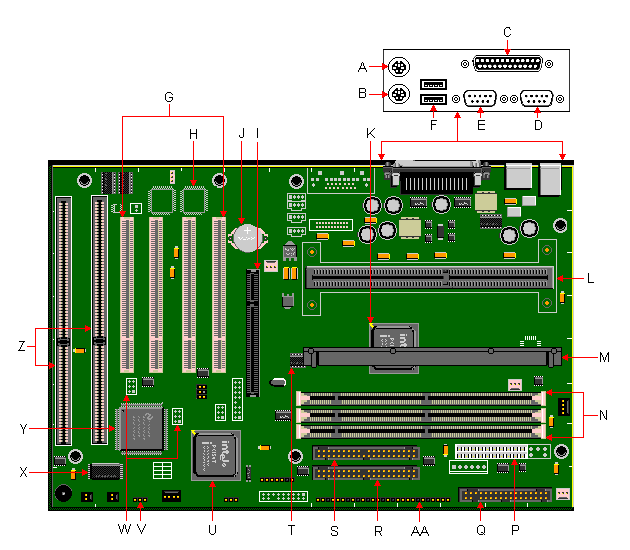
| Item | Description | Item | Description | |
|---|---|---|---|---|
| A | PS/2 Keyboard Port | N | DIMM Sockets | |
| B | PS/2 Mouse Port | P | Power Supply Connector | |
| C | Parallel Port | Q | Floppy Connector | |
| D | Serial Port 2 | R | Primary IDE Connector | |
| E | Serial Port 1 | S | Secondary IDE Connector | |
| F | USB Ports | T | CYP2275A Frequency Generator | |
| G | PCI Slots | U | PC97307-VUL Super I/O Controller | |
| H | Yamaha OPL3-SA3 Solder Pad (Optional) | V | System Configuration Jumper Block J8B2 | |
| I | AGP Port | W | Yamaha OPL4-ML Wavetable Upgrade Module Headers (Optional) | |
| J | Battery | X | Flash BIOS | |
| K | 82443LX PCI AGP Controller (PAC) | Y | 82371AB PIIX4 | |
| L | SLOT1 SEC Cartridge Connector | Z | ISA Slots | |
| M | Heatsink Support Base | AA | Front Panel Connectors (J8H2) | |
Front Panel Connectors (J8H2)

Note
Some configurations of this motherboard utilize the Yamaha OPL3 On-board Audio Controller chipset. These configurations will have additional interfaces on the back of the unit. The additional ports are a 15-pin D-shell MIDI/Game port and three stereo mini-jacks for Line-In, Line-Out and Mic.

Jumpers
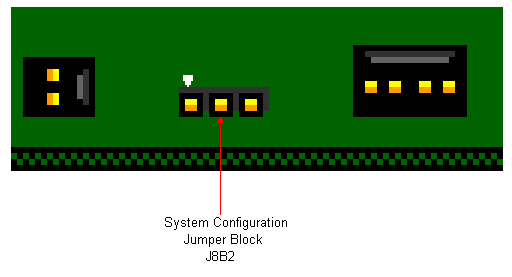
System Configuration Jumper Block J8B2 is the only jumper block on this motherboard. Settings are listed below.
Pin 1 is indicated by a white arrow on the motherboard as illustrated.

| Function | Jumper J8B2 | Configuration |
|---|---|---|
| Normal | The BIOS uses current configuration information and passwords for booting. | |
| Configure | After POST, CMOS Setup runs automatically. The maintenance menu is displayed. | |
| Recovery | The BIOS attempts to recover the BIOS information. A recovery diskette is required. |
On The Maintenance Menu: (see /805 Setup - Maintenance)
Setting CPU Speed:
To set the proper CPU speed when upgrading the CPU, select "Processor Speed". Use the "+" or "-" keys to select the proper speed, or press "Enter" to display all the speeds as a sub-menu. Then use the "+" or "-" keys, or the up-arrow or down-arrow keys, to select the proper speed. Press "Enter" to set the CPU speed.
Clearing CMOS Password:
To clear all passwords, select "Clear All Passwords" on the Maintenance Menu, then press "Enter" to execute the command.
You may continue to the other CMOS setting screens and make any changes as needed.
Exit the CMOS setup procedure and save any changes.
The system will then prompt the user to perform the following steps,
ATI Xpert 98 AGP 2x
Yamaha OPL3-SA3 Audio Chipset
Chipsets