|
|
|
The SEC cartridge has a heatsink, either full- or half-size, mounted to it, which cannot be removed without removing the SEC cartridge. The full-size heat sink is supported by the Heatsink Support Base and Top Bar, which secures the heatsink and protects the PCI chipset underneath it. If the heat sink has a fan mounted on it, the fan power supply connector must be disconnected before the SEC cartridge can be safely removed. For processors operating up to 333MHz, the speed of the processor can be set by using the configuration jumper (J8A1) on the motherboard to enable Configuration Mode. (See Motherboard Layout for setting information.) For processors operating at 350MHz or faster, the processor speed will be auto-detected on boot-up.
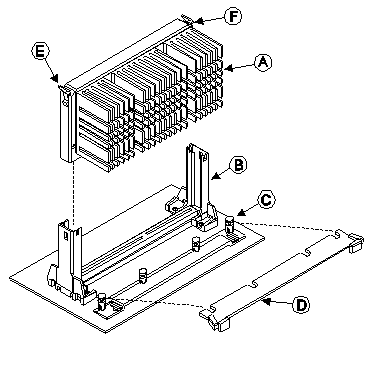
| Figure 1 | |
|---|---|
 |
|
| Figure 1 Legend | |
| A | SEC Cartridge with Example Heatsink Attached |
| B | SEC Cartridge Retention Mechanism |
| C | Heatsink Support Base |
| D | Heatsink Support Top Bar |
| E | Right Latch Arm |
| F | Left Latch Arm |
CPU Removal & Insertion (Figure 1)
 |
Note: Observe Electro Static Discharge (ESD) precautions. |
The steps for removal of the SEC Cartridge are as follows:
Reverse the above procedure for reinstallation.