|
|
|
Sound 144 AM/AMSP Bundled Software
Note
The software for the SOUND 144AM/AMSP card can be found
in the C:\SOUND144 directory.
 Overview
Issues
Setup
Layout
����������������������Ŀ
� Next Ctrl+N �
� Prev Ctrl+P �
� Go To... Ctrl+G �
� Today Ctrl+T �
� Show Day View F3 �
����������������������Ĵ
� Customize Title �
� Start Week On... �
� Clear Events... �
����������������������Ĵ
� Blotter �
� Exit Alt+F4 �
������������������������
�������������������������Ŀ
�-� Go To... �
�������������������������Ĵ
� �
� �����������Ŀ ������Ŀ �
� �January �_� �1994 _� �
� ������������� �������� �
� �
� �
� ��������Ŀ ��������Ŀ �
� � OK � � Cancel � �
� ���������� ���������� �
���������������������������
����������������������������������������������������������������Ŀ �-� Audio Calendar � �����������������������������������������������������������������Ĵ | File View Alarm Help � �����������������������������������������������������������������Ĵ � � | ���������������������������������Ŀ ��������������������������Ŀ� � �Wednesday, December 01 �_�_� � �����������Ŀ �������Ŀ�� � ���������������������������������Ĵ � � � � _ � ()� � 01:14 ��� � � 7:00 AM ____________________ �_� � ������������� ��������ٳ� � � 7:30 AM ____________________ �Ĵ � Message Recorder Clock �� � � 8:00 AM ____________________ �۳ ���������������������������ٳ � � 8:30 AM ____________________ � � ��������������������������Ŀ� � � 9:00 AM ____________________ � � �Notes: �� � � 9:30 AM ____________________ � � � �� � �10:00 AM ____________________ � � � �� � �10:30 AM ____________________ � � � �� � �11:00 AM ____________________ � � ���������������������������ٳ � �11:30 AM ____________________ � � ��������������������������Ŀ� � �12:00 PM ____________________ �Ĵ �Calendar Event: �� � �12:30 PM ____________________ �_� � �� � ����������������������������������� ���������������������������ٳ �������������������������������������������������������������������
���������������������������������Ŀ
�-� Customize Title �
���������������������������������Ĵ
� �
� ����������������Ŀ �
� Title Line 1 �Voyetra � �
� ������������������ �
� ����������������Ŀ �
� Title Line 2 �Audio Calendar � �
� ������������������ �
� �
� �
� ��������Ŀ ��������Ŀ �
� � OK � � Cancel � �
� ���������� ���������� �
�����������������������������������
������������������������Ŀ
�-� Start Week On... �
������������������������Ĵ
� �
� ������������������Ŀ �
� �Sunday �_� �
� �������������������� �
� �
� �
� ��������Ŀ ��������Ŀ �
� � OK � � Cancel � �
� ���������� ���������� �
��������������������������
���������������������������Ŀ
�-� Start Week On... �
���������������������������Ĵ
� �
� From: �
� ������������Ŀ ������Ŀ �
� �January �_� �1920 _� �
� �������������� �������� �
� Thru: �
� ������������Ŀ ������Ŀ �
� �January �_� �1994 _� �
� �������������� �������� �
� �
� �����������������Ŀ �
� �Audio Msgs. Only�� �
� ������������������� �
� �
� ��������Ŀ ��������Ŀ �
� � OK � � Cancel � �
� ���������� ���������� �
�����������������������������
����Ŀ ����Ŀ �����Ŀ ����Ŀ �File� �View� �Alarm� �Help� ����������������������Ŀ���������������Ŀ��������������Ŀ������������Ŀ � Data Directory... �� Next Ctrl+N�� Set F2�� Contents...� � Clear Events... �� Prev Ctlr+P�� Defaults... �� About � � Remove Audio Messages�� Go to...Ctrl+G������������������������������� ����������������������Ĵ� Today Ctrl+T� � Close ������������������ ������������������������
Issues
Setup
Layout
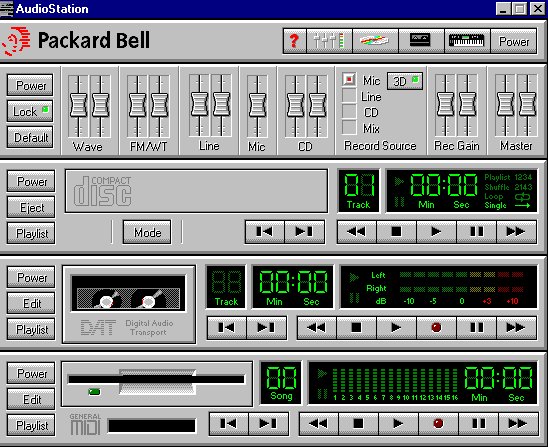
Power Bar
The Power Bar launches the various Audiostation components. Each component is launched by pressing the appropriate icon button. To close a component, press the icon button again. Components are stacked from the top down, in the order they are launched.
Power
Terminates the Audiostation application.
Mixer
Launches or closes the Mixer Component.
CD
Launches or closes the CD Player Component.
Digital Audio Transport
Launches or closes the DAT Component.
Help
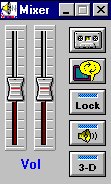
Launches Audiostation Help. Mixer Component The Mixer Component controls the volume and tone levels on the sound card. Because each sound card supports different mixer functions, not all Audiostation mixers look the same. Buttons And Controls Lock Locks the stereo pairs of sliders together so you can quickly adjust their volume while preserving their relative volumes. Default Sets all mixer levels to a reasonable starting volume. This is helpful for setting up a quick mix. Fader Modules The Fader Modules control the left and right stereo volumes for the function labeled at the bottom of the module. The "lock" button locks the stereo pairs together for easy mixing. CD Component The CD Component plays regular audio CDs in the CD-ROM drive. It features the same type of functionality as a home CD player, including looping and shuffle play. You can also make playlists of your favorite songs and save the lists for future listening sessions. Buttons And Controls Transport

Next/Previous
![]()
The Next/Previous buttons jump playback to the next or previous track in the playlist. Holding down the <Shift> Key and clicking on Next or Previous will bring you to the first or last track. Power Closes the component. Eject Ejects the CD from the CD-ROM drive. Mode Selects one of the following CD playback modes:
PLAYLIST
Plays the CD tracks selected in the currently loaded playlist. The tracks are played in the order they are listed in.
SHUFFLE
Plays the CD tracks in random order.
LOOP
Plays the CD tracks in the order they are listed on the CD. After the last track it loops back to the beginning of the CD.
SINGLE
Plays the CD tracks in the order they are listed on the CD one time through and stops. CD Playlist This option allows you to create lists of your favorite tracks on a CD. You can play these tracks in any order. These lists are automatically saved and loaded when you insert a new CD. The playlist also lets you name the CD and its tracks.
Procedures
Playing A CD
To play a CD insert an audio CD in your CD-ROM drive. Press the "Mode" button to select the desired Mode, then press "play" to begin playing. If you select the playlist mode, you must first make a playlist.
Creating A CD Playlist
To create a CD Playlist you first should name the CD and the CD Tracks. This will make it easier to identify the songs as you are creating the list. To name the CD press the "Name CD" button. This will bring up a dialog box which will let you type in the name of the CD. When you press "OK," the name will appear in the caption bar at the top of the playlist window.
To name a track
Press the "Name Track" button. Select the track with the track number numerical and type in the name of the track. The "Next" button advances to the next track in the list. Since the focus is on the "Next" button, pressing <Enter> will automatically advance to the next track, allowing you to quickly type in a number of track names. Once you have named the CD tracks, you can add them to your playlist. Double click on each song you want to add, or highligh them and press the "Add" button. The "Add All" button adds the entire CD to the list. This is helpful if you want to hear all but a few songs on the CD.
To remove Songs from the list
Highlight the song and press the Delete button. Digital Audio
Transport Component Buttons And Controls Transport

Next/Previous
![]()
Creating A Text Message
Text messages can be created in Voice Net and sent to any number of users. To create a message click in the text box and type in your message. Press the Clear button to delete old text left in the text box. Reading A Message If you have messages the minimized Voice Net icon will begin to blink or a message box will appear notifying you that you have messages. To read your messages press the Read button after activating Voice Net. This will display the message in the text area and play the audio message. If you want to hear the audio message again press the play button. For more than one message, press
the Read button again to receive the next message.
Note
Messages are written over permanently when you read in the next message. To save the text, highlight the text and choose Copy from the Edit menu to copy it to the clipboard. The message can then be
pasted into any word processor.
To Record A Voice Message
To record an audio voice message you must have a microphone hooked up to your sound card. You also must configure your sound card's Windows
mixer so that you can record from its microphone input at a reasonable level.
AUDIO TRANSPORT BUTTONS
Stop, Play, Record and Pause.
CLEAR BUTTON
Clears the text message screen and the current audio message.
SEND BUTTON
Displays the Send To... dialog box where the user selects where the message is to be sent.
MESSAGES NUMERIC DISPLAY
Displays the number of incoming messages.
READ BUTTON
Displays the incoming text message and plays the audio message. Messages are read in the order they were received.
TEXT AREA
Displays incoming text messages and allows you to type in your own messages.
STATUS DISPLAY
Provides feedback on the current operation or status of Voice Net.
AUDIO DISPLAY
Tells the user if there is an audio message.
Edit Menu
COPY
Copies the selected text or a picture on a card and places it onto the Clipboard, leaving the original intact and deleting the previous Clipboard contents.
CUT
Deletes the selected text or a picture on a card and places it onto the Clipboard, replacing the previous Clipboard contents.
PASTE
Embeds or copies the text information from the Clipboard into the text area.
UNDO
Undoes the last text edit or format command. Undo is grayed out when there is nothing to undo. Holding down the <Shift> Key and clicking on Next or Previous will bring you to the first or last track. Power Closes the component. Playlist The playlist window lets you audition and create lists of files for playback. You can save and load playlists during a different session. To create a list:

Next/Previous
![]()
Creating A Text Message
Text messages can be created in Voice Net and sent to any number of users.
To create a message click in the text box and type in your message.
Press the Clear button to delete old text left in the text box.
Reading A Message
If you have messages the minimized Voice Net icon will begin to
blink or a message box will appear notifying you that you have
messages. To read your messages press the Read button after activating Voice Net. This will display the message in the text area and play the audio message. If you want to hear the audio message
again press the play button. For more than one message, press
the Read button again to receive the next message.
Note
Messages are written over permanently when you read in the next message. To save the text, highlight the text and choose Copy from the Edit menu to copy it to the clipboard. The message can then be
pasted into any word processor.
To Record A Voice Message
To record an audio voice message you must have a microphone hooked up to your sound card. You also must configure your sound card's Windows
mixer so that you can record from its microphone input at a reasonable level.
AUDIO TRANSPORT BUTTONS
Stop, Play, Record and Pause.
CLEAR BUTTON
Clears the text message screen and the current audio message.
SEND BUTTON
Displays the Send To... dialog box where the user selects where the message is to be sent.
MESSAGES NUMERIC DISPLAY
Displays the number of incoming messages.
READ BUTTON
Displays the incoming text message and plays the audio message. Messages are read in the order they were received.
TEXT AREA
Displays incoming text messages and allows you to type in your own messages.
STATUS DISPLAY
Provides feedback on the current operation or status of Voice Net.
AUDIO DISPLAY
Tells the user if there is an audio message.
Edit Menu
COPY
Copies the selected text or a picture on a card and places it onto the Clipboard, leaving the original intact and deleting the previous Clipboard contents.
CUT
Deletes the selected text or a picture on a card and places it onto the Clipboard, replacing the previous Clipboard contents.
PASTE
Embeds or copies the text information from the Clipboard into the text area.
UNDO
Undoes the last text edit or format command. Undo is grayed out when there is nothing to undo. Holding down the <Shift> Key and clicking on Next or Previous will bring you to the first or last track. Power Closes the component. Playlist The playlist window lets you audition and create lists of files for playback. Playlists can be saved then loaded again during a different session. To create a list:
To Record
Issues
Setup
Layout
Issues
Setup
Layout
Note
This program is in the C:\SOUND144\UTILITY directory.
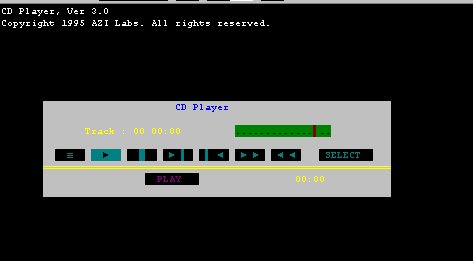
This is the DOS Audio CD Player.
Use this file to play audio CDs. CD Controls Press the <Down Arrow> to use the CD controls.
Pressing the <Left Arrow> and <Right Arrow> cycles
through the CD controls:
PAUSE PLAY STOP NEXT TRACK PREVIOUS TRACK FAST FORWARD REWIND SELECT
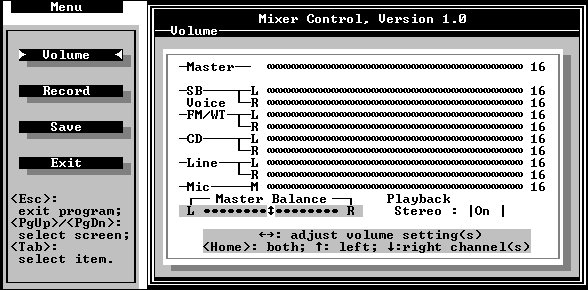
Mixer Controls Press <Enter> on the SELECT button to change which mixer option will be controlled:
VOLUME BALANCE BASS TREBLE
Press the <Up Arrow> to set CDPLAY
to modify the selected mixer option. Press the <Left Arrow>
and <Right Arrow> to modify the selected mixer function.
Issues
Setup
Layout
Note
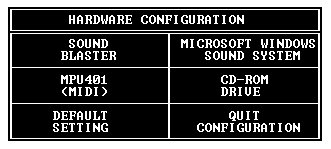
Main Menu Options This section describes each of the menu options in the CONFIG.EXE program and its various user-configurable hardware settings. Sound Blaster
�����������������������������������������������ͻ
� HARDWARE CONFIGURATION �
�����������������������������������������������
� Sound Blaster �
�����������������������������������������������Ķ
� Description � Current Setting �
�����������������������������������������������Ķ
� � � �����������ͻ
� Port Address �> 220H <� � > 220H <�
� � � � 240H �
�����������������������������������������������Ķ ������������1/4
� � �
� Interrupt � IRQ5 �
� � �
�����������������������������������������������Ķ
� � �
� DMA Channel � DMA 1 �
� � �
�����������������������������������������������Ķ
� � �
� Game Port � Enabled �
� � �
������������������������������������������������1/4
Port Address Available values are "220H" and "240H." The SB compatibility module on the SOUND144 requires a range of the system's I/O port address for data and command transfers. The two available I/O port address ranges include 220H-22FH and 240H-24FH. To select an I/O port address range, specify the base address of the particular range (220H or 240H). Interrupt Available values are "IRQ 2," "IRQ 3," "IRQ 5," and "IRQ
" This setting is used to select an interrupt for use by the SB compatibility module. DMA Channel Available values are "DMA 0", "DMA 1", and "DMA 3" Game Port Available values are "Enable" and "Disable." This setting is used to enable or disable the game port on the SOUND144 AM/SP sound card. Microsoft Windows Sound System (MWSS)
�����������������������������������������������ͻ
� HARDWARE CONFIGURATION �
�����������������������������������������������
� Microsoft Windows Sound System (MWSS) �
�����������������������������������������������Ķ
� Description � Current Setting �
�����������������������������������������������Ķ
� � � �����������ͻ
� Use MWSS �> YES <� � > YES <�
� � � � NO �
�����������������������������������������������Ķ ������������1/4
� � �
� Port Address � 530H �
� � �
������������������������������������������������1/4
Use MWSS Available values are "Yes" and "No." This setting is used to enable or disable the MWSS compatibility module on the SOUND144 AM/SP. Port Address Available values are "530H," "604H," "E80H," and "F40H." The MWSS compatibility module requires a range of the PC's I/O port address for data and command transfers. The four available I/O port address ranges include 530H-537H, 604H-60BH, E80H-E87H, and F40H-F47H. To select an I/O port address range, specify the base address of the particular range: 530H, 604H, E80H, or F40H.
MPU401 (MIDI)
�����������������������������������������������ͻ
� HARDWARE CONFIGURATION �
�����������������������������������������������
� MPU401 (MIDI) �
�����������������������������������������������Ķ
� Description � Current Setting �
�����������������������������������������������Ķ
� � �
� MPU401 Enabled � YES �
� � �
�����������������������������������������������Ķ
� � �
� Port Address � 330H �
� � � �����������ͻ
�����������������������������������������������Ķ � > IRQ2 <�
� � � � IRQ5 �
� Interrupt �> IRQ2 <� � IRQ7 �
� � � � IRQ10 �
������������������������������������������������1/4 ������������1/4
MPU401 Enabled Available values are "Yes" and "No." This setting is used to enable or disable the MIDI module on the SOUND144 AM/SP. Port Address Available values are "300H" and "330H." The MIDI module requires a range of the PC's I/O port address and command transfers. The two available I/O port address ranges include 300H-301H and 330H-331H.
To select an I/O port address range, specify the base address of the particular range: 300H or 330H. Interrupt Available values are "IRQ 2," "IRQ 5," "IRQ 7," and "IRQ10." This setting is used to select an interrupt for the MIDI module.
CD-ROM Drive
�����������������������������������������������ͻ
� HARDWARE CONFIGURATION �
�����������������������������������������������
� CD-ROM Module �
�����������������������������������������������Ķ
� Description � Current Setting �
�����������������������������������������������Ķ
� � �
� CD-ROM Model �> Panasonic <�
� � �
������������������������������������������������1/4
CD-ROM Model Available values are "Panasonic," and "Disabled." Use this setting to specify the type of CD-ROM drive connected to the SOUND 144 AM/AMSP.
Disabling The EEPROM
The changes made to the hardware settings with the CONFIG.EXE program are saved onto the memory chip (EEPROM) of the SOUND 144 AM/AMSP. This allows the sound card to start operations with the required hardware setting values every time. Use the JMPCFG jumper to configure the SOUND 144AM/AMSP sound card to ignore all the current hardware setting values.

Issues
Setup
Layout
Note
This program is in the C:\SOUND144\UTILITY directory.
DIAGNOSE.EXE is the diagnostic software. This will test the 8-bit sound, 16-bit sound, FM Synthesizer, and MIDI IN/OUT capabilities of the card.
FM Music
This is a hardware test for the FM module.
�������������������������������������ͻ
� SOUND TEST �
�������������������������������������
� �
� Now Playing FM Music... �
� �
� IMPORTANT: �
� �
� If no sound is heard, please �
� check speakers/headphones �
� connection �
� �
� Refer to Troubleshooting Guide �
� in the User's Manual �
� �
��������������������������������������1/4
Sound Blaster 8 Bit .Voc
This is a hardware test for the Sound Blaster compatibility module.
�������������������������������������ͻ
� SOUND TEST �
�������������������������������������
� LEFT �> BOTH <� RIGHT �
� SPEAKER � SPEAKERS � SPEAKER �
�������������������������������������Ķ
� �
� Now Playing 8-Bit .VOC File �
� (both speakers)... �
� �
� IMPORTANT: �
� �
� If no sound is heard, please �
� check speakers/headphones �
� connection �
� �
� Refer to Troubleshooting Guide �
� in the User's Manual �
� �
��������������������������������������1/4
16-Bit .WAV
This is a hardware test for the 16-bit "Wave" audio output.
�������������������������������������ͻ
� SOUND TEST �
�������������������������������������
� LEFT �> BOTH <� RIGHT �
� SPEAKER � SPEAKERS � SPEAKER �
�������������������������������������Ķ
� �
� Now Playing 16-Bit .WAV File �
� (both speakers)... �
� �
� IMPORTANT: �
� �
� If no sound is heard, please �
� check speakers/headphones �
� connection �
� �
� Refer to Troubleshooting Guide �
� in the User's Manual �
� �
��������������������������������������1/4
MIDI-Out
This is a hardware test for the MIDI output.
�������������������������������������ͻ
� SOUND TEST �
�������������������������������������
� �
� �ڿڿ� �ڿڿڿ� �ڿڿ� �ڿڿڿ� �
� ������ �������� ������ �������� �
� ������ �������� ������ �������� �
� ����ٳ ������ٳ ����ٳ ������ٳ �
� ������ �������� ������ �������� �
� �
�������������������������������������Ķ
� �
� IMPORTANT: �
� �
� If no sound is heard, please �
� check speakers/headphones �
� connection �
� �
� Refer to Troubleshooting Guide �
� in the User's Manual �
� �
��������������������������������������1/4
MIDI-In
This is a hardware test for the MIDI input.
�������������������������������������ͻ
� SOUND TEST �
�������������������������������������
� �
� �ڿڿ� �ڿڿڿ� �ڿڿ� �ڿڿڿ� �
� ������ �������� ������ �������� �
� ������ �������� ������ �������� �
� ����ٳ ������ٳ ����ٳ ������ٳ �
� ������ �������� ������ �������� �
� �
� Press the keys of the MIDI �
� instrument to test. �
� �
�������������������������������������Ķ
� �
� IMPORTANT: �
� �
� If no sound is heard, please �
� check speakers/headphones �
� connection �
� �
� Refer to Troubleshooting Guide �
� in the User's Manual �
� �
��������������������������������������1/4
Issues
Setup
Layout
Note
This program is in the C:\SOUND144\UTILITY\ directory.
EASYSTAR.EXE is a program that allows you to execute certain bundled programs or utilities from a main menu.
To Execute The Easy Start Program:

There are four program options available in the EASY START menu. These are listed below:
Sound Card Testing Executes the diagnostics program DIAGNOSE.EXE.
Sound Card Configuration Executes the configuration program.
CONFIG.EXE.
Sound Card Mixer Control Executes the DOS mixer utility program.
MIXTSR.EXE.
Application Allows you to select the execution of the CDPLAY.EXE, Sound Script, or Windows programs.
CD Play Executes CDPLAY.EXE.
Sound Script Invokes a DOS jukebox that plays several tunes. You can skip a tune and go to the next one by pressing the <Enter> key.
Windows
Issues
Setup
Layout
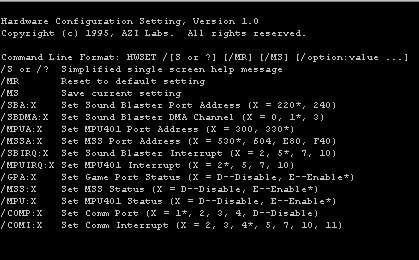
| PARAMETER | DESCRIPTION |
| /S or /? | This parameter is used to display the various options of HWSET.EXE in a single, simplified help screen. |
| /MR | This parameter restores the SOUND 144 AM/AMSP to its factory default settings. This parameter is ignored when the EEPROM chip is disabled. |
| /MS | This parameter stores the current values of SOUND 144 AM/AMSP's hardware settings to the EEPROM. This parameter is ignored when the EEPROM is disabled. |
Mixer Options And Values Listed below are the valid Mixer options and values to use. For example, to set the Sound Blaster compatibility module's left channel volume to 10 and the right channel volume to 12, type: HWSET /VV:10,12 <Enter>
| OPTION | VALUE | DESCRIPTION |
| VV | 0-16,0-16 | Sets the left channel (0-16) and right channel (0-16) volume for the Sound Blaster compatibility module. |
| VF | 0-16,0-16 | Sets the left channel (0-16) and right channel (0-16) volume for the FM Music Synthesizer and Wave Table Synthesizer modules. |
| VL | 0-16,0-16 | Sets the left channel (0-16) and right channel (0-16) volume for the Line-in and CD-audio sources. |
| VM | 0-16 | Sets the volume for the microphone. |
Hardware Options And Values Listed below are the valid Hardware
options and values that can be used.
For example, to set the CD-ROM drive type to PANASONIC and the CD-ROM drive's IRQ to 15, type:
HWSET /CD:P /CDIRQ:15 <Enter>
| OPTION | VALUE | DESCRIPTION |
| /SBA:X | 220 or 240 | Sets the Sound Blaster compatibility module's I/O port address range. |
| /SBDMA:X | 0,1,3 | Set Sound Blaster DMA Channel |
| /MPUA:X | 300 or 330 | Sets the MPU401 (MIDI) module's I/O port address range. |
| /MSSA:X | 530, 604, E80 or F40 | Sets the Microsoft Windows Sound System compatibility module's I/O port address range. |
| /SBIRQ:X | 2,5,7 or 10 | Sets the Sound Blaster compatibility module's interrupt. |
| /MPUIRQ | 2,5,7 or 10 | Sets the MPU401 (MIDI) module's interrupt. |
| /CD:X | P(anasonic) or D | This option sets the type of CD-ROM drive you have connected to your sound card. You would set this option to "D" if there is no CD-ROM drive. |
| /GPA:X | D or E | Enables (E) or disables (D) the SOUND 144 AM/AMSP's game port. |
| /MSS:X | D or E | Enables (E) or disables (D) the Microsoft Windows Sound System compatibility module. |
| /MPU:X | D or E | Enables (E) or disables (D) the MPU401 (MIDI) module. |
| /COMP:X | 1, 2, 3, 4, D--Disable | Set Comm Port |
| /COMI:X | 2, 3, 4, 5, 7, 10, 11 | Set Comm Port Interrupt |
Note | This is a Windows Application. It is in the SOUND 144 Utilities Group. |
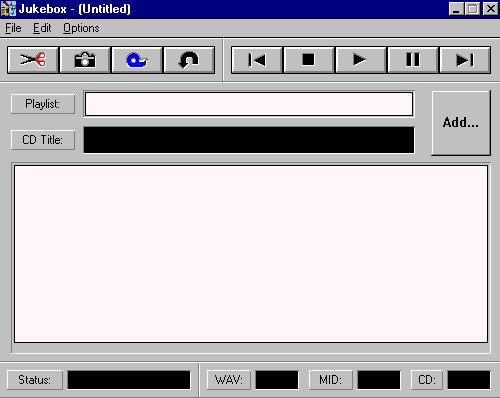
| 1. | OVERVIEW In Jukebox, you can create a list of "songs"
to be played. These "songs" can be a mixture of .WAV
files, .MID files, and CD Audio tracks.
To add more songs to the current playlist, press the ADD button. The following screen will appear:
|
| 2. | MENU COMMANDS
����Ŀ ����Ŀ �������Ŀ
�File� �Edit� �Options�
�����������������Ŀ������������������������Ŀ��������������Ŀ
� New �� Undo Ctrl+Z�� Auto-Audition�
� Open... Ctrl+O�������������������������Ĵ� Loop �
� Save... Ctrl+S�� Cut Ctrl+X�����������������
� Save As... �� Copy Ctrl+C�
�����������������Ĵ� Paste Ctrl+V�
� Exit �������������������������Ĵ
� About Jukebox...�� Delete All '.WAV' �
�����������������Ĵ� Delete All '.MID' �
� 1 �� Delete All 'CD' �
� 2 �������������������������Ĵ
� 3 �� Deselect All Ctrl+D�
� 4 ���������������������������
�������������������
|
| /3D:ON | Set 3D stereo on |
| /3D:OFF | Set 3D stereo off |
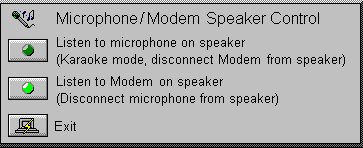
| /MIC:ON | Set microphone monitoring on |
| /MIC:OFF | Set microphone monitoring off |
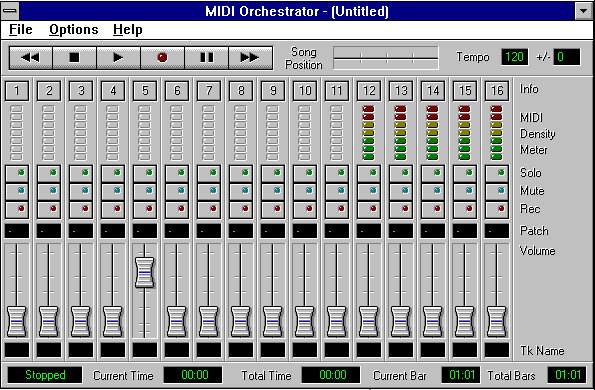
| 1. |
OVERVIEW MIDI Orchestrator is used to play .MID files. The .MID
files can also be edited here. Below is the screen that will show
up when MIDI Orchestrator is first launched:
|
| 2. | SCREEN AREAS AND CONTROL |
| A. | TRANSPORT
|
| B. | SONG POSITION
The Song Position slider provides a visual indication of the current song position. You can also grab the pointer with the mouse to move to any position within the song. |
| C. | TEMPO
There are two tempo controls: The contol labeled Tempo displays and allows you to set the current tempo. The control labeled +/- is the Tempo Offset. The Tempo Offset provides a way to increase or decrease the tempos of songs that were composed with a tempo map by adding or subtracting a specified value to/from each value in the tempo map. |
| D. | MIDI DENSITY METERS The MIDI Density Meters display the relative number of notes that are being played in each channel. |
| E. | CHANNEL INFO
Clicking on a Channel Info button brings up the Channel Info dialog box for that channel. The Channel Info dialog box shows the MIDI tracks that are assigned to that channel and allows you to name them. There also is a Transpose function which lets you transpose the pitch of the selected track by octaves and/or semi-tones. Lastly, the Patch combo box provides an alternate way of selecting a patch for that channel. |
| F. | SOLO
Clicking on a Solo button, mutes all other channels, allowing you to listen to only the "soloed" track. Pressing the <Ctrl> key while clicking on various Solo buttons allows you to solo multiple tracks at one time. |
| G. |
MUTE
Clicking on the Mute button on any channel disables playback of that channel. |
| H. | RECORD ENABLE
Activating a channel's Record Enable button allows MIDI data to be recorded onto that channel when you initiate recording. |
| I. | PATCH SELECTOR
The Patch Selector allows you to select or change the sound that the channel plays. To select or change the patch: Click on the top half of the Patch Selector control to increase the value, click on the bottom half of the numerical to decrease the value. Or, click on the Patch Selector control and drag up or down to increase or decrease the values. You can also select patches from the Channel Info dialog box. |
| J. | VOLUME SLIDER
The Volume Sliders let you increase or decrease the playback volume of each channel. |
| K. | Status Area The Status Area displays information about the current song file and the status of the MIDI Orchestrator itself (Playing, Paused, Recording, etc). The Bar values are displayed in the format "Bars:Beats." The Time values are displayed in the format "Minutes:Seconds." |
| 3. | MENU COMMANDS |
| A. | FILE |
| 1. | NEW
Opens a new, empty file. |
| 2. | OPEN
Presents a dialog box to select the file that you wish to load. The MIDI Orchestrator can load MIDI files in the standard .MID format only. |
| 3. | SAVE
Saves the currently-loaded file to disk. If the file already has a name, it will be saved with that name. Otherwise, the Save As... dialog box will appear. |
| 4. | SAVE AS...
Presents a dialog box for naming and saving the current file to disk. |
| 5. | EXIT
Quits the MIDI Orchestrator. |
| 6. | FILES LIST
The bottom portion of the MIDI Orchestrator's File menu lists the last four MIDI files that you have opened or saved, with the most recently-opened file listed at position |
| 1. | This makes it easy to re-open any of the last four files worked on. To open a MIDI file in this list, simply click on the desired file name. |
| B. | OPTIONS |
| 1. | METRONOME
When the Metronome option is enabled, the MIDI Orchestrator will produce a tone from the PC speaker to use as a timing reference whenever you are playing back or recording. |
| 2. | AUTO REWIND
When the Auto Rewind option is enabled, the MIDI Orchestrator will automatically rewind to the beginning of the song whenever playback or recording is stopped. |
| 3. | SAVE SETTINGS ON EXIT
When you renable the "Save Settings on Exit" option, the "Metronome" and "Auto Rewind" settings are saved as you quit the program. |
| 4. | MIDI INPUT DEVICE
Presents a dialog box from which you can select the input device to record incoming MIDI data from an external keyboard. |
| C. | HELP |
| 1. | HELP INDEX
Accesses the MIDI Orchestrator's on-line Help system. |
| 2. | ABOUT MIDI ORCHESTRATOR...
Presents the MIDI Orchestrator's About... box, containing version information and the address and phone number of Voyetra Technologies. |
| 4. | EXPLANATION OF MIDI TERMINOLOGY |
| A. | MIDI
The Musical Instrument Digital Interface (MIDI) is a serial computer interface that allows electronic musical instruments and computers to communicate with each other. |
| B. | CHANNEL
The MIDI standard allows MIDI data to be separated into 16 MIDI channels. These separate channels allow sequencers like the MIDI Orchestrator, MIDI instruments, and sound cards to work with 16 separate musical parts at one time. Each MIDI channel can be assigned a MIDI patch or sound. When used with a multi-timbral synthesizer or sound card, the MIDI Orchestrator's 16 MIDI channels can be assigned to play 16 separate sounds at one time. Although each channel can contain multiple tracks, each track assigned to the same MIDI channel will play back the same sound. |
| C. | PATCH
A patch refers to the sound that the synthesizer or sound card is using to play the MIDI data on a particular channel. A synthesizer patch or sound is sometimes referred to as a "Program." When you send a synthesizer or sound card a Patch Change message, you are sending it a message that tells it to switch to a different sound. This is similar to pushing the sound selection buttons on the front panel of a synthesizer. Whenever you start playback or recording with the MIDI Orchestrator, each channel sends a Patch Change message corresponding to the number displayed in its Patch Selector numerical. |
| D. | MIDI INTERFACE
A serial interface, usually an optional accessory for the sound card, that allows you to connect one or more MIDI devices (keyboards, tone modules, etc.) to the computer. |
| E. | RECORD STANDBY MODE
The first time you click on the Record button, the MIDI Orchestrator will go into Record Standby mode, meaning it is ready to start recording. When in this mode, the Record button's red LED will blink. Once the MIDI Orchestrator is in Record Standby mode, click on the Play button to begin recording. |
| F. | TRACK In MIDI
the word "track" usually refers to a single musical part, such as a bass line or a main melody. With the MIDI Orchestrator, each channel may contain multiple tracks which can be independently named and transposed. However, all tracks assigned to a given channel will use the same sound or patch. |
| G. | RE-MAPPING (MIDI FILES)
When a MIDI file is recorded, its MIDI information is "mapped" so that the MIDI data will play using the correct sounds, volume relationships, and in some cases the correct octave registration. A MIDI song that was composed on one synthesizer will often not play correctly on a different synthesizer. The MIDI Orchestrator lets you remap MIDI songs to play correctly on a given synthesizer or sound card. Re-mapping may include adjusting the relative volumes of the different tracks, re-assigning the patches so that each track plays the correct sound, and adjusting octaves as needed. For example, if a MIDI file's Bass track is mapped to your synthesizer's Kazoo sound, it will not sound very good. To fix this, change the patch assignment of that channel to correspond to your synthesizer's Bass sound. If the pitch sounded too high, you could transpose the track's octave registration to a lower setting. Once you properly re-map all the tracks, you can adjust each channel's Volume Slider to get just the right mix. When you get the file to a point where it plays correctly on your system, use the MIDI Orchestrator to re-save the file. |
| F. | TRANSPOSE
Transpose refers to raising or lowering the pitch of a track by octaves or semi-tones. |
| G. | DRUMS AND MIDI
Unlike the melodic typical sounds that a synthesizer produces (piano, organ, bass, etc.), a synthesizer's drum sounds are usually all mapped to one channel. Each of the different drum sounds (bass drum, snare drum, cymbal etc.) are produced by playing different notes on that channel. Most sound cards map their drum sounds to either channel 10 or channel 1 |
| 6. | Typically, most popular sound cards that use FM synthesis map their drums to channel 16, while "high-end" wavetable sound cards and external General MIDI tone modules (such as the Roland Sound Canvas) map their drums to channel 10. Refer to your sound card or tone module's documentation for a chart listing the available drum sounds and their corresponding Note values. |
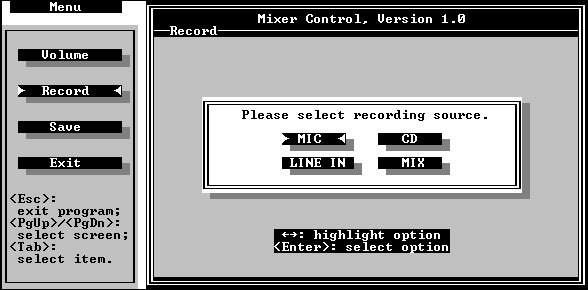
Record
| /AMEM:xx | to specify the Kbytes of digital Audio Memory reserved |
| /CLP or /CLP:xx | to reserve memory for the Command Line Player |
| /CD:x | to specify which CD-ROM to use |
| /NETFIX | for issues with non-NOVELL networks |
| /LINE or /MIC | to force default record source |
| /MPORT | to use the port options in MIDI files |
| /LOOP | to make MIDI files play continuously |
| /HILO:x | to override channel steering logic |
| /RES:x | to set the Vapi timer to an x msec period |
| /REM | to remove |

| 1. | OVERVIEW Say It! is a simple, yet effective,
tool for adding voice annotation to any OLE-compatible document.
Say It! uses a convenient method to embed sound files into your
document.
Press a "hot key" to activate Say It!, speak into your microphone, then click on the Accept button. The sound file is then embedded into your document at the current cursor position. When you launch Say It!, the following screen is displayed:
|
| 2. | SCREEN AREAS AND CONTROLS |
| A. | SCROLL BAR During recording, the Scroll Bar displays the amount of elapsed time relative to the maximum length. During playback, the Scroll Bar displays the current position relative to the length of the recording. Also use the Scroll Bar to select a specific point in the recording from which to play. |
| B. | Transport The Say It! transport is designed for quick and easy operation. Rewinding is done automatically, each time you press the "Stop" button, and you can easily move to any portion of the recording with the Scroll Bar. |
| C. | MAXIMUM Displays the maximum allowable recording length. To adjust, choose "Maximum Length" from the Setup menu. |
| D. | CURRENT Displays the current record/playback position in the format: [minutes:seconds]. |
| E. | STATUS Displays the current status of Say It: Ready (stopped), Playing, Recording, or Paused. |
| F. | ACCEPT After recording a note,
pressing the "Accept" button will embed the
Noteas an OLE object into your document at the current insertion point. If you are working in a non-OLE application, pressing the "Accept" button will have no real effect, other than to minimize Say It!. |
| G. | CANCEL The "Cancel" button aborts the recording and minimizes Say It!. |
| 3. | MENU COMMANDS |
| A. | EDIT |
| 1. | COPY
Copies the current recording into Say It!'s Clipboard. This is useful for transferring recordings into WinDAT for editing. The Copy command can also be used to manually embed recordings into a document. Use Say It!'s "Copy" command to copy the recording to the Clipboard, and then use the OLE client's "Paste" command to embed the recording into the document. |
| 2. | PASTE
Pastes the contents of Say It!'s Clipboard into Say It! itself. This feature allows you to transfer recordings from WinDAT into Say It!. |
| B. | SETUP |
| 1. | AUTO RECORD
When "Auto Record" is enabled, Say It! automatically begins recording as soon as it is activated. |
| 2. | HOT KEY
You activate Say It! by pressing a pre-determined QWERTY key combination called a "Hot Key". Although the default Hot Key is "<CTRL>-R," you may change it by choosing "Hot Key" from the Setup menu. |
| 3. | MAXIMUM LENGTH
The Maximum Length dialog box allows you to set the maximum allowable recording length in the format [minutes:seconds]. Because digital audio files can get rather large, it is important to set a reasonable maximum recording length to limit the file size of your recordings. You can set the Maximum Length to any value between one second and two minutes. |
| 4. | ALWAYS ON TOP
When the Always on Top option is enabled, Say It! will always appear on top of any other applications. This prevents the Say It! window from getting "lost" when your Windows desktop is tiled with a number of applications. |
| C. | HELP |
| 1. | HELP Activates Say It!'s on-line Help system. |
| 2. | ABOUT SAY IT...
Displays a dialog box with copyright information and the revision number. |
| 4. | PROCEDURES |
| A. | LOADING SAY IT!
There are two different ways to load Say It!: |
| 1. | In most cases, the installation program will add Say It! to your Startup group. Using this method, Say It! is automatically started every time you run Windows. It reduces to an icon ready to activate as soon as you press the Hot Key. |
| 2. | You can also load Say It! by double-clicking on its icon, just as you would with any other Windows program. |
| B. | ACTIVATING SAY IT!
Once Say It! has been loaded, you can use one of several different methods to activate it: |
| 1. | Press the Hot Key sequence from your QWERTY keyboard. The default is <CTRL>-R; however, to customize Say It!'s Hot Key, choose "Hot Key" from the Setup. |
| 2. | Double-click on the Say It! icon, just as you would to activate any other Windows program. |
| 3. | Select "Record Note" from the System menu an the OLE client application (Windows Write, Microsoft Word, Excel, etc.). |
| 4. | Press <ALT>-<TAB> repeatedly until the Say It! name and icon appears in the Windows Program Selector box. |
| C. | RECORDING A Note To record a Note with Say It!, you must have your sound card properly installed and a microphone hooked up to it. You also must configure your sound card's Windows mixer so that you can record from its microphone input at a reasonable level. To record a voice Note with Say It: |
| 1. | If Say It! was not loaded automatically as part of your Startup group, double-click on its icon. |
| 2. | Run the OLE client application, then load or create the desired document. If you simply want to experiment with Say It!, try running Windows Write and loading a document. |
| 3. | From within your document, click on the location where you want to embed the recording. |
| 4. | Press the Hot Key sequence (the default is <CTRL>-R) to activate Say It!. If "Auto Record" is enabled, Say It! will begin recording immediately. If "Auto Record" is not enabled, click on the Record button twice to begin recording. |
| 5. | Speak into the microphone. When you are done recording, press the "Stop" button. This will cause Say! It to stop recording and rewind to the beginning of the note. |
| 6. | If you want, click on the "Play" button to check or verify what you have just recorded. |
| 7. | If the recording
is acceptable, click on the "Accept" button to embed
it into your document. The Notewill automatically be embedded at the location you specified in step |
| 3. |
| D. | RE-RECORDING A NOTE Press the "Record" button twice. Say It! will not embed your message until you press the "Accept" button. |
| E. |
LISTENING TO AN EMBEDDED Note
To hear a Note embedded in your document: |
| 1. | Double-click on the embedded Say It! or WinDAT icon in the document. |
| 2. | Click on the embedded icon and choose Say It! Object, Play from the OLE client's Edit menu. |
| F. | EDITING A Note
WITH WINDAT Say It!'s recordings can be pasted into Voyetra's WinDAT program for convenient editing. |
| 1. | Double click on the WinDat icon to launch the WinDAT program. |
| 2. | Choose Copy from the Say It!'s "Edit" menu to copy the recording into the Windows clipboard. |
| 3. | Without minimizing Say It!, choose "Paste" from the "Edit" menu in WinDAT. This will paste your recording into WinDAT and allow you to edit it. |
| 4. | Once you have completed your editing, choose Select All from the "Edit" menu in WinDAT then choose Copy. This will copy the edited recording into the Windows clipboard. |
| 5. | Without closing or minimizing WinDAT choose Paste from the Say It! "Edit" menu to paste the file back into Say It. |
| 6. | Finally, press Accept to update the document with the edited recording. Alternatively, you can bypass steps 4-6 by simply dragging WinDAT's drag-and-drop icon to the desired location in your document. |
| G. | CONFIGURING SAY IT!'S HOT KEY
Say It! can be activated by pressing a hot key combination. The default is <CTRL>-R however this can be easily changed to a different key combination. |
| 1. | Select Hot Key from the Setup menu. |
| 2. | The <CTRL> key will always be a part of the key combination, however you can select any letter or number and the <ALT> or <Shift> keys to be a part of your new Hot Key combination. |
| 3. | Press "OK" to accept the new Hot key combination. |
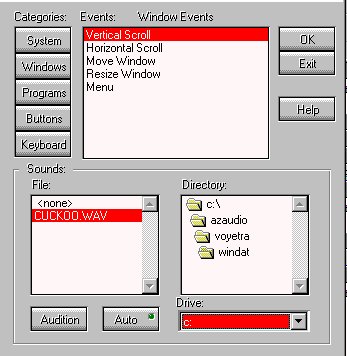
| 1. | OVERVIEWSound Events is a utility that allows you to trigger digital audio (.WAV) files with Windows events. For example you can select a sound to play whenever you move or size a window. You can also assign sound effects to your QWERTY keyboard. To hear sounds, you must have your sound card properly installed and configured for Windows. Sound Events is typically run from the Start Up group and will automatically minimize itself. To assign sounds to system events, double click on the Sound Events icon. |
| 2. | ASSIGNING SOUNDS TO WINDOWS EVENTS
The following is a procedure to assigning sounds to system events. |
| 1. | Select one of the Event Categories. This will display the list of events from that category. |
| 2. | In the Events: list, select the event to which you want to attach a sound. |
| 3. | In the Sounds: area, choose a drive letter and directory where your sound files (.WAV) are located. |
| 4. | Audition the sound files and choose the sound file you want to be associated with the currently selected event. Your choices are automatically saved as you make them. |
| 5. | Repeat steps 1-4 for each event. |
| 6. | When you are finished, minimize Sound Events or press the OK button. |
| 3. | EVENT CATEGORIES
For organization, the Windows events are broken down into the following categories: |
| A. | SYSTEM
The System events category provides a way to alternate sounds to your Start Up and Shut Down Windows events. Start Up: When the Windows environment is booted up. Shut Down: When the Windows environment is closed. |
| B. | WINDOW
The Window events category lets you assign sounds to generic Windows events such as "resize" window, "move" window, "scroll bar" and "more..." |
| C. | BUTTONS
The Buttons category allows you to assign sounds to a number of common buttons found in Windows including "OK," "Cancel," "Browse," "Help" and "more..." |
| D. | PROGRAMS
The Programs category lets you assign a sound to the startup and close of each Windows application. To assign a sound to a program: |
| 1. | Press the "Program" button. This will display a files dialog box. |
| 2. | Select the program you want to assign a sound to and press the "OK" button. |
| 3. | To assign the sound, choose the event and the sound. |
| E. | KEYBOARD
The Keyboard events category allows you to assign a different sound to each key on your PC's keyboard. |
| 4. | AUDITIONING A WAV FILE
To audition a .WAV file, select a sound file and press the Audition button. If you want to audition a number of files, press the "Auto" button. This will automatically play each file as you click on them. |
 Overview
| 1. | Press the Record button. The red LED will begin blinking, indicating that the recorder is in Record/Standby mode. |
| 2. | To begin recording press Play and speak into the microphone. |
| 3. | When you have completed your message press Stop. The Audio message indicator will change to YES. |
| 4. | To hear the message press Play. The message can be sent with a text message, or by itself. To Send A Message To send a message you must first create a text or audio message. Once you have a message, press the Send button. The program will prompt you with a list of users. Select one or more users and press "Send" to send the message. Screen Areas And Buttons |

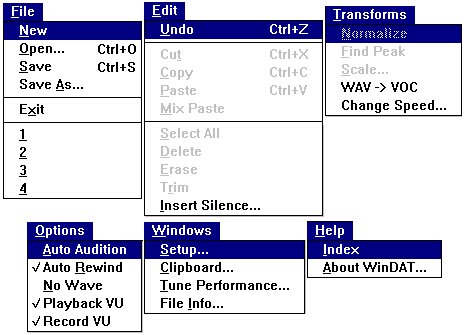
| 1. | OVERVIEW WinDAT is an application that will
record .WAV files. WinDAT writes the file as it is recording,
so the size of the .WAV is limited only to the available space
of the hard drive.
|
| 2. | COMMANDS
|
| A. | FILE |
| 1. | NEW
Creates a new, empty file based on the settings in the Setup window. New does not erase the contents of the Clipboard. |
| 2. | OPEN
Presents a dialog box to select the file that you wish to load. The Files dialog box also lets you select the file format that you wish to look for (.WAV or .VOC). |
| 3. | SAVE
Saves the currently loaded file to disk. If the file already has a name, it will be saved with that name. Otherwise, the Save As... dialog box will appear. |
| 4. | SAVE AS...
Presents a dialog box for naming and saving the current file to disk. |
| 5. | EXIT
Quits WinDAT. |
| 6. | FILE LIST
The bottom portion of WinDAT's File menu lists the last four audio files that you have opened or saved, with the most recently-opened file listed at position |
| 1. | This makes it easy to re-open any of the last four files worked on. To open an audio file in the Files List, simply click on the desired file name. |
| B. | EDIT |
| 1. | UNDO
Restores the file to the state it was in before the last Edit or Transform operation. |
| 2. | CUT
Removes the selected range and shifts the rest of the file back to fill in the gap, similar to deleting text in a word processor. The deleted data is placed in WinDAT's Clipboard. |
| 3. | COPY
Puts a copy of the selected range in the Clipboard without altering the file. |
| 4. | PASTE
Inserts the contents of the Clipboard at the start of the currently-selected range (as indicated by the Start Marker), and shifts the data after that point to the right. |
| 5. | MIX PASTE
Mixes the contents of the Clipboard with the data in the current file, beginning at the Start point of the currently-selected range (as indicated by the Start Marker). |
| 6. |
SELECT ALL
Selects the entire length of the file as the range. This is useful for executing an Edit or Transform on the entire file. |
| 7. | DELETE
Deletes the selected range, but does not move the data to the Clipboard. |
| 8. | ERASE
Puts a copy of the selected range in the Clipboard and replaces it with silence. |
| 9. | TRIM
Deletes all data except the selected range. The contents of the Clipboard remain unchanged. Trim is useful for eliminating unwanted data at the beginning and end of a recently recorded file. 10. INSERT SILENCE Inserts a specified amount of silence at the Start Marker, shifting everything after the Start Marker to the right. 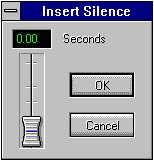
|
| C. | TRANSFORM |
| 1. | NORMALIZE
Scales the amplitudes in the selected range so that the peak value is converted to the maximum possible amplitude; the rest of the amplitudes are scaled proportionally. The "Normalize" selection lets you optimize the loudness of files that have been recorded at too low a level, without introducing distortion. |
| 2. | FIND PEAK
The "Find Peak" Transform locates the highest level (amplitude) within the selected range, and then displays a dialog box with information about the peak. "Find Peak" gives you a convenient way to locate unwanted peaks that may be causing distortion so that they can be Scaled, Deleted, etc. |
| 3. | SCALE
The "Scale Transform" is used to increase or decrease the loudness (amplitude) of the selected range by a specified factor between .01 and 10.00. For example, a scaling factor of willl double the amplitude, and a factor of 0.5 will halve the amplitude. Scale is useful for matching the loudness between different files when cutting and pasting between them. |
| 4. | WAV
-> VOC Converts the current file from the Microsoft .WAV format to the Creative Labs .VOC format. |
| 5. | CHANGE SPEED
Allows you to change the apparent speed of the current file by converting the sample rate. Higher sample rates will make the file playback faster and at a higher pitch, and lower sample rates will produce slower and lower pitched playback.
|
| D. | OPTIONS |
| 1. | AUTO AUDITION
The "Auto Audition" option lets you automatically preview audio files: simply click on the audio files from the Files list box. Enable "Auto Audition" in the Options menu, then choose Open or Save As from the Files menu. When you click on a file in the Files list box, WinDAT will play that file until you click on another file or another control. |
| 2. | AUTO REWIND
When the "Auto Rewind" option is enabled, WinDAT will automatically rewind to the beginning of the file after it stops playing. |
| 3. | NO WAVE
When the "No Wave" option is enabled, the Graphic File Display will disappear and WinDAT's entire window will shrink vertically. The "No Wave" option is handy if you want to reduce WinDAT's size so that it can share your desktop with other applications. Additionally, it can help save time by eliminating the wait normally required for re-drawing the graphic file display (especially when you're working with large files), and it can help reduce the amount of system overhead when playing back files at high data rates. When you click on "No Wave" again to disable it, the Graphic File Display will return and WinDAT will be restored to its previous window height. |
| 4. | PLAYBACK VU
When the "Playback VU" option is enabled, WinDAT's VU Meters will be active during playback. Disabling the VU meters can help to reduce system overhead if you are experiencing issues playing back files at high data rates. |
| 5. | RECORD VU
When the "Record VU" option is enabled, WinDAT's VU Meters will be active during recording. Disabling the VU meters can help to reduce system overhead if you're experiencing issues recording at high data rates. |
| 6. | ALWAYS ON TOP
When the Always on Top option is enabled, WinDAT will always appear on top of any other applications that are running. This prevents WinDAT from getting "lost" when you're running several different programs. |
| E. | WINDOW |
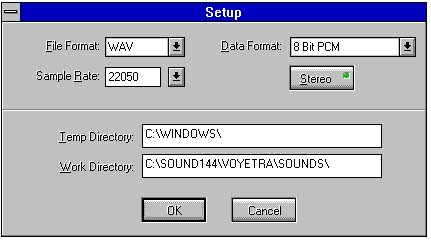
| 1. | SETUP
Displays the Setup dialog box for selecting the File Format (VOC or WAV), Sample Rate, Stereo/Mono, Bit Length/Data Format,Temp Directory and Work Directory . When a file is loaded, the Setup dialog box will always display the sample rate that the file was saved with. When you choose OK from the Setup window, its settings are saved as WinDAT's new defaults.
|
| 2. | CLIPBOARD WINDOW
Activates a window containing information about the contents of WinDAT's Clipboard, such as what file the data came from, the duration of the data, etc. Clicking on the Clipboard window's "Play" button lets you audition the contents of the Clipboard before performing a "Paste" or "MixPaste" operation. NoteWinDAT uses its own Clipboard format, which allows it to share data with OLE Client applications and other Voyetra programs, such as AudioView, Annotator, etc. It is not to be confused with the regular "Windows Clipboard". |
| 3. | PERFORMANCE TUNE
The "Performance Tune" window lets you adjust various WinDAT parameters to eliminate issues playing or recording at high data rates. In general, you should only modify the default Performance Tune settings if you experience data rate issues. Such issues are indicated either by a file that cuts-off abruptly, or by a "Disk Could Not Keep Up With Digital Audio" error message.
|
| a. | Play Buffer
(Default=4 Seconds) Determines the size of the memory buffer that WinDAT will use during playback. |
| b. | Record Buffer
(Default=8 Seconds) Determines the size of the memory buffer that WinDAT will use during recording. |
| c. | Pre-Write (Default=128Bytes) When you are preparing to record, the Pre-Write setting will determine the size of the area on your hard drive that WinDAT will "pre-allocate" for the digital audio data (in kBytes). This gives WinDAT access to a contiguous area of the disk, minimizing the overhead required to record the data. |
| 1. | If you encounter difficulties during playback of a high data rate file (i.e. 44k, 16 bit, stereo), try to increase the value of the Play Buffer. |
| 2. | If you encounter difficulties while recording, try to increase the value of the Record Buffer. You can also try to increase the size of the Pre-Write value. It should be equal to the maximum size of the file you will be recording (in Kilobytes). |
| 3. | FILE INFO
Provides statistical information for the currently loaded file including; sample rate, bit resolution, length, size, format, etc. |
| F. | HELP |
| 1. | INDEX Activates WinDAT's on-line Help system. |
| 2. | ABOUT WINDAT Displays information about WinDAT's date and revision. |
| 1. | Run TAPI1
|
| 2. | Type WAVREC <filename> at C:\SOUND144\VOYETRA\CMDPLAY and record desired sounds. |
| 3. | Type
WAVPLAY <filename> at C:\SOUND144\VOYETRA\CMDPLAY and the
selected file should play. Use ENDPLAY.EXE to stop the playback
of the .WAV file. NoteThe TAPI1 |
| 6. | BAT file, located in the same directory, must be run before executing these programs. |

Use the 3D button to enable or disable the 3D sound effects capablility on the SOUND 144AMSP. Pressing the PLAY button (picture of two arrows chasing each other) will expand the mixer to allow modifications to the output mixer controls:
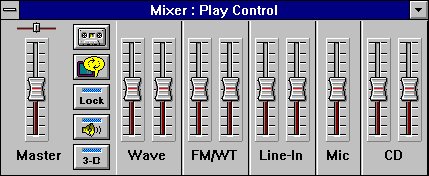
Pressing the REC. button (picture of a cassette) will expand the mixer to allow modifications to the input mixer controls:

 Volume in drive C has no label
 Volume Serial Number is 083E-0FDD

Directory of C:\SOUND142

.              <DIR>        01-29-97 10:14a .
..             <DIR>        01-29-97 10:14a ..
SETUP    EXE       234,496  07-17-95  4:14p SETUP.EXE
SETUP    INF         2,834  07-17-95  3:59p SETUP.INF
SETUP    BMP        14,426  02-08-93  4:07p SETUP.BMP
README   COM        16,430  09-28-94  2:00p README.COM
README   TXT           307  07-17-95  9:13a README.TXT
UTILITY        <DIR>        01-29-97 10:14a UTILITY
VOYETRA        <DIR>        01-29-97 10:14a VOYETRA
ROCKY1FL TXT             0  01-30-97  1:14p rocky1fl.txt
         6 file(s)        268,493 bytes

Directory of C:\SOUND142\UTILITY

.              <DIR>        01-29-97 10:14a .
..             <DIR>        01-29-97 10:14a ..
EASYSTAR EXE        47,010  07-13-95 12:34p EASYSTAR.EXE
CDPLAY   EXE        52,722  07-04-94  4:44p CDPLAY.EXE
CONFIG   EXE       134,964  08-25-94 11:29a CONFIG.EXE
DEMO16   WAV       275,516  03-01-93  8:10p DEMO16.WAV
DEMO8    EXE        22,792  01-14-94  6:10p DEMO8.EXE
DEMOFM   EXE        24,462  03-03-93 10:48a DEMOFM.EXE
DIAGNOSE EXE        59,432  07-16-95 11:29a DIAGNOSE.EXE
MICMODE  EXE        75,632  07-03-95 10:42a MICMODE.EXE
HWSET    EXE        28,418  10-31-94  1:11p HWSET.EXE
MIC3D    EXE        15,650  12-22-94 11:39a MIC3D.EXE
MIXTSR   EXE        52,458  11-21-94  9:40a MIXTSR.EXE
WINMIXW  EXE       140,288  01-06-95  2:54p WINMIXW.EXE
SAMPLE   VOC        50,833  06-28-94 11:23p SAMPLE.VOC
SETMODE  EXE        15,714  10-27-94  1:26p SETMODE.EXE
VOLSET   EXE        19,458  08-30-94 11:02a VOLSET.EXE
DEMO16   EXE        13,685  07-14-95 11:12a DEMO16.EXE
AZCAL    EXE        10,029  01-17-95  9:24a AZCAL.EXE
DIAGNOSE PIF           967  01-29-97  1:23p DIAGNOSE.PIF
        18 file(s)      1,040,030 bytes

Directory of C:\SOUND142\VOYETRA

.              <DIR>        01-29-97 10:14a .
..             <DIR>        01-29-97 10:14a ..
CMDPLAY        <DIR>        01-29-97 10:14a CMDPLAY
SOUNDS         <DIR>        01-29-97 10:14a SOUNDS
JUKEBOX        <DIR>        01-29-97 10:14a JUKEBOX
WINDAT         <DIR>        01-29-97 10:14a WINDAT
SONGS          <DIR>        01-29-97 10:14a SONGS
         0 file(s)              0 bytes

Directory of C:\SOUND142\VOYETRA\CMDPLAY

.              <DIR>        01-29-97 10:14a .
..             <DIR>        01-29-97 10:14a ..
VAPIP16  COM        11,653  06-27-94 11:43a VAPIP16.COM
AAPIP16  COM         9,073  07-18-94 10:07a AAPIP16.COM
VMP16    COM        25,982  06-06-94 11:27a VMP16.COM
SAPI!P16 COM        17,708  02-21-94  5:23p SAPI!P16.COM
TAPI16   BAT           323  07-13-94  1:14p TAPI16.BAT
ENDPLAY  EXE        12,865  05-26-93  9:27a ENDPLAY.EXE
MIDPLAY  EXE        20,172  05-26-93  9:22a MIDPLAY.EXE
WAVPLAY  EXE        10,259  10-01-93  2:28p WAVPLAY.EXE
WAVREC   EXE        10,467  10-01-93  3:05p WAVREC.EXE
         9 file(s)        118,502 bytes

Directory of C:\SOUND142\VOYETRA\JUKEBOX

.              <DIR>        01-29-97 10:14a .
..             <DIR>        01-29-97 10:14a ..
VCTL     DLL        97,520  06-12-95 11:25a VCTL.DLL
PICTBTN  DLL         9,216  12-01-92 10:02a PICTBTN.DLL
SAMPLE   JUK           216  10-21-92 12:36p SAMPLE.JUK
VYIOSVC2 DLL         8,952  11-23-92  4:52p VYIOSVC2.DLL
VMP_MM   DLL        19,616  04-22-94 10:04a VMP_MM.DLL
WJUKE    EXE       109,056  11-29-94  3:11p WJUKE.EXE
         6 file(s)        244,576 bytes

Directory of C:\SOUND142\VOYETRA\SONGS

.              <DIR>        01-29-97 10:14a .
..             <DIR>        01-29-97 10:14a ..
MOOD2    MID        25,729  07-28-93  1:00a MOOD2.MID
SAINTSGO MID        10,235  07-28-93  1:00a SAINTSGO.MID
HELLOMYB MID         9,361  07-28-93  1:00a HELLOMYB.MID
AMERICA  MID         3,643  07-28-93  1:00a AMERICA.MID
CANNON_D MID        29,096  07-28-93  1:00a CANNON_D.MID
PRELUE#3 MID        12,800  07-28-93  1:00a PRELUE#3.MID
PETE&WLF MID        12,373  07-28-93  1:00a PETE&WLF.MID
MINWLTZ  MID        20,858  07-28-93  1:00a MINWLTZ.MID
MAPLERAG MID        19,224  07-28-93  1:00a MAPLERAG.MID
ENTRTANR MID        23,136  07-28-93  1:00a ENTRTANR.MID
        10 file(s)        166,455 bytes

Directory of C:\SOUND142\VOYETRA\SOUNDS

.              <DIR>        01-29-97 10:14a .
..             <DIR>        01-29-97 10:14a ..
ALARM    WAV        42,461  09-04-92  2:25p ALARM.WAV
CAMRA    WAV        43,598  09-04-92  2:25p CAMRA.WAV
DOGBRK   WAV        13,345  09-04-92  2:25p DOGBRK.WAV
DOORBL   WAV        27,602  09-04-92  2:25p DOORBL.WAV
GLASBK   WAV        26,975  09-04-92  2:25p GLASBK.WAV
SINKDR   WAV        45,725  09-04-92  2:25p SINKDR.WAV
SLDWST   WAV        23,956  09-04-92  2:25p SLDWST.WAV
SPACE    WAV        44,669  09-04-92  2:26p SPACE.WAV
TRAINW   WAV        59,142  09-04-92  2:26p TRAINW.WAV
WHIP     WAV        12,556  09-04-92  2:26p WHIP.WAV
        10 file(s)        340,029 bytes

Directory of C:\SOUND142\VOYETRA\WINDAT

.              <DIR>        01-29-97 10:14a .
..             <DIR>        01-29-97 10:14a ..
AUDIOSTA EXE       475,568  07-11-95 10:10a AUDIOSTA.EXE
NWCALLS  DLL       145,120  12-30-92  2:37p NWCALLS.DLL
AUDIOSTA HLP        43,470  11-12-93  1:59p AUDIOSTA.HLP
CAL      INI         2,283  01-26-94  2:16p CAL.INI
CALHELP  HLP        23,144  02-16-95 12:27p CALHELP.HLP
GENMIDI  INI         2,109  01-26-93 10:05a GENMIDI.INI
ORCHENG  DLL        28,832  07-10-95  2:50p ORCHENG.DLL
SAYIT    EXE        96,256  04-05-95  9:26a SAYIT.EXE
SNDEVENT EXE       115,200  12-15-94  9:57a SNDEVENT.EXE
ORCH     EXE       260,928  07-10-95  3:00p ORCH.EXE
ORCH     HLP        82,180  04-05-93  1:17a ORCH.HLP
SAYIT    HLP        21,707  02-07-95 11:17a SAYIT.HLP
SNDEVENT HLP        12,506  06-15-95 11:09a SNDEVENT.HLP
NWLOCALE DLL        38,608  12-22-92  2:52p NWLOCALE.DLL
CAL      EXE       165,792  07-11-95  5:19p CAL.EXE
NWNET    DLL       194,784  12-30-92  2:46p NWNET.DLL
VCTL     DLL        97,520  06-12-95 11:25a VCTL.DLL
VHOOK    DLL        15,360  04-21-94 11:42a VHOOK.DLL
VMP_MM   DLL        19,712  07-07-95  5:21p VMP_MM.DLL
VOICENET EXE       115,760  02-10-94  5:18p VOICENET.EXE
VOICENET HLP        10,045  05-12-93 10:58a VOICENET.HLP
VOY      SCR        28,320  06-28-93  2:29p VOY.SCR
VOYHOOK  DLL         4,096  05-05-93  1:45p VOYHOOK.DLL
WINDAT   EXE       184,176  05-23-94 11:06a WINDAT.EXE
WINDAT   HLP        73,233  01-17-94  4:27p WINDAT.HLP
        25 file(s)      2,256,709 bytes

Total files listed:
        84 file(s)      4,434,794 bytes
        23 dir(s)      99,057,664 bytes free