|
|
|
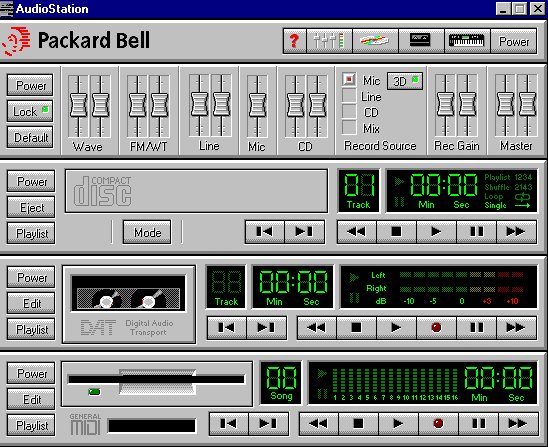
Power Bar
The Power Bar launches the various Audiostation components.
Each component is launched by pressing the appropriate icon button.
To close a component, press the icon button again. Components
are stacked from the top down, in the order they are launched.
Power
Terminates the Audiostation application.
Mixer
Launches or closes the Mixer Component.
CD
Launches or closes the CD Player
Component.
Digital Audio Transport
Launches or closes the DAT Component.
Help
Launches Audiostation Help.
Mixer Component
The Mixer Component controls the volume and tone levels on the sound card. Because each sound card supports different mixer functions, not all Audiostation mixers look the same.
Buttons And Controls Lock
Locks the stereo pairs of sliders together so the user may adjust the volume while preserving the relative volumes.
Default
Sets all mixer levels to a reasonable starting volume. This is helpful for setting up a quick mix.
Fader Modules
The Fader Modules control the left and right stereo volumes for the function labeled at the bottom of the module. The "lock" button locks
the stereo pairs together for mixing.
CD Component
The CD Component plays regular Audio CDs in the CD-ROM drive. This features
the same type of functionality as a home CD player, including looping and shuffle play. Make playlists of favorite songs and save the lists for future listening sessions.
Buttons And Controls Transport

Next/Previous
![]()
The Next/Previous buttons jump playback to the next or previous track in the playlist. Holding down the <Shift> Key and clicking on Next or Previous will bring the user to the first or last track. Power Closes the component.
Eject
Ejects the CD from the CD-ROM drive. Mode Selects one of the following CD playback modes:
Playlist
Plays the CD tracks selected in the currently loaded playlist. The tracks are played in the order they are listed in.
Shuffle
Plays the CD tracks in random order.
Loop
Plays the CD tracks in the order they are listed on the CD. After the last track it loops back to the beginning of the CD.
Single
Plays the CD tracks in the order they are listed on the CD one time through and stops. CD Playlist This option allows the user to create lists of the favorite tracks on a CD. The user can play these tracks in any order. These lists are automatically saved and loaded when inserting a new CD. The playlist also lets the user name the CD and the tracks.
Procedures
Playing A CD
To play a CD insert an audio CD in the CD-ROM drive. Press the "Mode"
button to select the desired Mode, then press "play"
to begin playing. If the user selects the playlist mode, a playlist must be created.
Creating A CD Playlist
To create a CD Playlist, name the CD and the CD Tracks. This will make it easier to identify the songs as the user is creating the list.
To name the CD press the "Name CD" button. This will
bring up a dialog box which will let the user type in the name of the
CD. When the user presses "OK," the name will appear in the
caption bar at the top of the playlist window.
To Name A Track
Press the "Name Track" button. Select the track with the track number numerical and type in the name of the track. The "Next" button advances to the next track in the list. Since the focus is on the "Next" button, pressing <Enter> will automatically advance to the next track, allowing
the user to quickly type in a number of track names. Once the user has named the CD tracks, the user can add them to the playlist.
Double click on each song to add, or highligh them and press the "Add" button. The "Add All" button adds the entire CD to the list. This function is helpful if the user wants to hear all but a few songs on the CD.
To remove Songs from the list
Highlight the song and press the Delete button.
Digital Audio Transport Component Buttons And Controls Transport

Next/Previous
![]()
Power
Closes the component.
Playlist
The playlist window lets the user audition and create lists of files for playback. Playlists can be saved then loaded again during a different session.
To Create A List
Select the file type.
Select the drive and directory with the desired files.
Highlight the file(s) to add to the list and press the Add button, or double click on the file.
The Add All button will add all of the files in the current directory to the playlist.
Save the list by pressing the save button.
This will present the file save dialog box which will let the user name and save the playlist.
Edit
The "edit" button launches the MIDI Orchestrator with the current MIDI song loaded. The MIDI Orchestrator allows the user to mix and record multi-track MIDI files.
Procedures
Playing A Midi File
To play a MIDI file from the MIDI Component press the "Playlist" button to call up the MIDI file playlist.
In the "Files" section, select the Drive and Directory where there are .MID files. Highlight the files to listen to and press the "Add" button. This will insert the files into the playlist. Press "OK" to close the playlist and return to the MIDI Component. Press the "Play" button in the transport. If there are multiple files in the playlist, pressing the Next/Previous buttons will advance or jump back to the previous song in the playlist.
Recording A MIDI File
To record a MIDI file the user must have a MIDI interface installed in the computer and a MIDI keyboard hooked up to the MIDI interface.
The MIDI Component can record MIDI information from the keyboard and play it back through the keyboard. The MIDI component receives on all or any of 16 MIDI channels. When it plays back the song, it sends the MIDI data out the MIDI interface to the keyboard on MIDI channel 1. (Most MIDI keyboards default to channel 1.) If the song cannot be heard when played back, make sure the keyboard is set to receive MIDI on channel 1.
To Record
Press the "record" button. The red light will start blinking.
Press the "play" button to begin recording. Play the MIDI keyboard. When finished recording press the "stop" button. To hear what has been recorded, press "play."